
So, in my freezer, on the very bottom shelf you will find plastic baggies. Plastic baggies filled with bones. All sorts of bones, some small, smaller than a finger, others quite large, not much smaller than a femur. Do I risk alerting the authorities to some heinous crimes committed? If you think yes, you probably need to lay off the procedural crime dramas and/or the booze.
What I have an entire berth in my freezer devoted to is the remnants of meals gone by. We believe in using the entire animal around here, atleast as much of it as we can get our hands on. Our ancestors knew instinctively that there were good nutrients in animal bones, the marrow especially. Every meat eating culture globally makes use of the bones of their food animals, that is by and large with the exception of most of America. Now I know in some parts of the country bone broth has become a “thing” with some shops selling a mug of broth for $8 or $10 bucks. That makes me chuckle, do it right and broth is basically free and tasty as hell. Before I get ahead of myself, lets back track a second just to be clear. Those bags of bones in my freezer, we usually divide them roughly by species; bovine, porcine, poultry, etc, that way at the end of meal, we throw the bones with whatever meat still remains, usually just connective tissue, into the respective bag before cleaning up. Quick and simple.
Now for the why. 1st reason, I don’t like waste, especially wasting an animal. There are alot of nutrients left in those bones that your dinner used to be attached to, and we’re going to get three more uses out of them before we done. The 2nd reason is, well, they taste awesome and they provide some vitamins and minerals you are probably missing in your diet.
To bring you up to speed on what the hell I am talking about, bone broth or stock is a liquid made placing bones and meat remnants in water and cooking them slowly to release nutrients both in the bone and in the center part of the bone called the marrow. Technically stock and broth are two different things. Broth is liquid that has had any meat cooked in it and stock always involves bones. I usually do a little of both and use both for different things. I’ll go through the process in a second, however the reason for this is that you want slightly different things. I like using a very rich broth for cooking, this allows me to dilute it as needed for some dishes but also allows a very thick, Unami flavor to others. I prefer a little lighter stock for drinking. Although, that is all personal preference. Just how we do it, after a good amount of trial and error here in the Country Boy household. Let’s get this straight real quick, there is no right or wrong way to go about this process, it is all personal preference and taste. Yeah, if you work in a French kitchen they have their own way about it. However, relax, enjoy and learn. No two batches are going to turn out alike. Everything from the specific animal, the original cooking of the meat, seasoning, everything is going to change the outcome. Embrace it. This isn’t an assembly line we’re talking about, this is real food and real animals.
So how do we do it? Pretty simple process. Grab yourself a couple of slow cookers, cheap works just fine here. A stock pot, a dutch oven, and an Insta-pot all have their places, this ain’t it. I’ll save you some time there, I’ve been through all of the above…multiple times just to check. A couple of cheap slow cookers is the way to go. They are going to stay on days at a time, which means their total lifespan isn’t going to super long so make sure it isn’t some heirloom piece that you are going to be heartbroken to lose.
Step 1. Gather your leftover bones in a bag in the freezer. It is helpful to write what animal the bag contains within, on the outside. You think you would be able to tell, but frozen beef, lamb and pork bones look remarkably similar. Unless you want to start digging through each bag to find a positively identifiable bone, while having an internal conversation about whether that was a thick pork chop or a lamb chop, just label the damn bag. This in itself should give you enough of an incentive to eat more meat with bones now that you have a goal and a bag to fill up. Good, you’ll be a happier healthier person, no shit (science stuff here, here, here and here).
Step 2. You are now the proud owner of a bag of bones, hopefully, multiple bags. Now I do interject, it used to be you could go to the butcher or the processor and they would give you all the bones you wanted. That is no longer the case, yet another in the list of things the damn hipsters ruined. Personally never done it, think it misses one of my reasons for making bone broth to begin with but to each their own. Just eat more meat with bones and this whole endeavor is basically free. However, if you are using uncooked bones I do recommend throwing the raw bones on the smoker or in the oven at low heat for a few hours. Speeds up the whole process and makes sure you don’t have anything nasty in the bones. I digress. You have a bag of bones. Find your slow cooker. Find counter space for your slow cooker. Plug it in and turn it on your slow cooker. Dump in your bones. You may have rearrange, get them all in there. You’ll want as many as possible, packed tightly. Now, add water to cover, a little more if you have room. Throw a splash of Apple Cider Vinegar in, close the lid and walk away. Usually, I turn the cooker to high. At this stage it doesn’t really matter. You just want to make sure the whole mixture doesn’t get to a true rolling boil, just at a simmer is where you want to sit. It’s gonna take a while, especially if the bones came straight out of the freezer. As for the Apple Cider Vinegar, several folks have argued that the vinegar helps leach more minerals from the bones, possible by changing the P.H. balance one would guess. However, my guess is that would take more than you really want to taste. Apple Cider Vinegar has some good qualities so my take is it can’t hurt. If you don’t have any laying around don’t stress it. Add white vinegar or don’t add any of any kind. In reality, it was something I started doing years ago, I usually have it on hand, and I like vinegar based stuff but as far as affecting your finished product; it probably doesn’t matter one way or another.
Step 3. Once your broth has come to a simmer with the lid on, let it simmer for an hour or two. Timing really isn’t crucial. However, when you get around to it, take the lid off, turn off the cooker then walk away for 15-20 minutes. When you come back grab a spoon and skim the film that has formed off the top. This is going to be mainly charred bits if you cooked over a fire and possibly at this stage a little fat. Anyway go ahead and get it out of there. Don’t get crazy here, again not crucial, just going to keep the charred bits from over flavoring the broth. Now put the top on, turn the thing back on and walk away. If I am feeling froggy at this stage I might throw a whole cayenne pepper in.
Step 4. Stay away. Resist the urge to take the top off. Looking ain’t cooking. The only reason to take the top off is if you notice your water level dropping noticeably if you do by all means add water. Once I have done step 3 I usually let the whole thing simmer on low for at least 24 hours.
Step 5. After 24 hours check it. This is where if I have large bones; pork shoulders, ham bones, big ribs, etc, I will grab some tongs and try to find them. If they look clean of meat and connective tissue, they should by now, I’ll go ahead and set up my second slow cooker and start transferring only the clean bones to the other cooker, repeating the start process I used with these. Depending on how your bones in the first cooker look you can go three ways from here. Didn’t know this was a Choose Your Own Adventure-type of project did you? If you feel like you just took all of your bones out of the first cooker then add more from the freezer and water to cover, return to heat. If you don’t have or don’t want to add more bones and have a pretty dark coffee color broth, add water and return to heat. If you have a good bit of meat and non bone solids in the cooker still, this is the way to go. Or you can turn the cooker off and start the first cooker in on the cooling process. If you are going this route skip ahead to step 7.
Step 6. I’m going to assuming your second cooker is steaming right along. This cooker is going to go for at least another 24 hours, probably even longer. When you think about it, you can take a large spoon and push a few bones in the pot and see if they are starting to get soft. This usually takes a day or two. You’ll also notice that the stock won’t change color near as much, that is because all of the meat and fat that gave the first batch it’s color are now absent. Don’t worry. Now I’ll add sea salt, since this is usually used for drinking in our house, Viking Juice if you will. Viking Juice if you won’t either, I don’t give a damn what you will or won’t in that regard, that’s just what we call it around here. You can also add any sort of seasoning at this point or wait until you are about to drink it later.
Step 7. The first cooker is probably about ready to start cooling. Turn the cooker off. Give it a few hours to cool, depending on your cooker and house temp. Once it has cooled decently, take a ladle, a large screen and a large mixing bowl. Transfer the liquid to the screen letting it drain into the bowl. Get as much off the liquid as you can, dump the contents of the screen back into the cooker when you are done, add water to cover again and restart your cooker. Now let your broth in the mixing bowl cool until it reaches a little above room temperature or where the fat starts to skim over. Now you can do two things here depending on your views on the world and “food safety.” Let the broth stay in the bowl and skim over completely and then remove the fat or you can go ahead and bottle it warm. I like the fat from grass feed animals so I generally just go ahead and bottle. However, if you are using less than optimal Industrial meat, skimming isn’t a bad idea. Either way, transfer the broth from the bowl to mason jars and close them up, leaving enough head-space for freezing. Give them a few more hours to cool then transfer to the freezer or fridge depending on when they are going to get used.
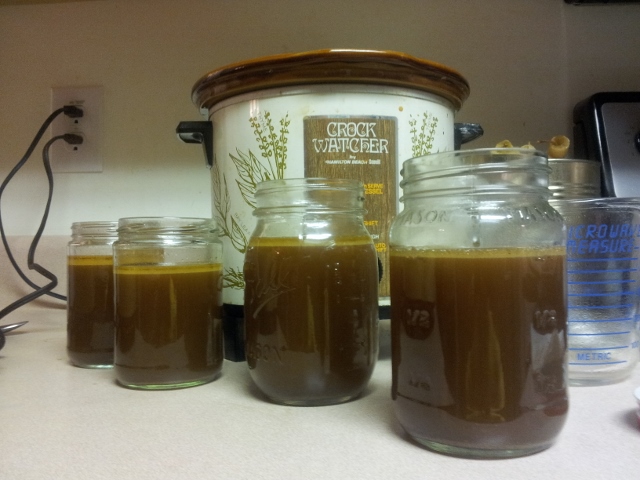
Step 8. Repeat step 7 for the second cooker. You will notice almost no visible fat and a whole different color. It should be so if you used clean bones. One small addition to Step 7 for this batch if you are going to use it for drinking. Strain it twice, the second time with a smaller screen. Just feels better in the mouth. Other than that you’re done. Go clean up your mess, oh yeah and send me somewhere between $9 and $10 bucks that I just saved your ass on every cup. I kid I kid.

Finishing touch. I told you we were going to get three uses out of the bones right? Well, your freezer now has both broth and stock. That’s two. Carry your bones out to the compost bin and dump those in. All the nutrients that are still left in them will do wonders for your soil. Seriously, fertilizer companies figured that out years ago. Mostly the magnesium (which is why people add Epson Salts to their garden) and calcium but the whole package is pretty useful. If you want to get real fancy, take the clean bones out of the second cooker, that should be super soft (if they aren’t make another batch) and throw them in the blender then take them out to the pile. As for the stuff in the first cooker, use your own judgment. I have a pretty well-protected animal proof compost area so I throw them all in. Depending on your own area and you own bear/raccoon/coyote/wolf situation/bobcat/hobo situation be an adult and figure out what works best for you. If you do have a coyote situation I might add that the contents of the first cooker make hell of coyote bait. Just throwing that out there… So now you have healthier compost to plant more food in, you have broth and stock and possibly entertainment in the form of some invasive species hunting. So what do you know, you got a bonus, 4 uses out of a waste product you were probably throwing away. If you were previously going the dog the bones, you got your own explaining to do. Make it up to him and pour some broth over his food, he’ll get over it real quick.
So now you have healthier compost to plant more food in, you have broth and stock and possibly entertainment in the form of some invasive species hunting. So what do you know, you got a bonus, 4 uses out of a waste product you were probably throwing away. If you were previously giving the dog the bones, you got your own explaining to do. Make it up to him and pour some broth over his food, he’ll get over it real quick.
Until next time, keep it real and keep it rural,
Lee